Why Homeowners Are Adding a Bathroom to a Basement (And Why It’s Worth It)
Adding a bathroom to a basement is one of the smartest upgrades you can make to your home — and it’s more doable than most people think.
Here’s a quick overview of what the process involves:
- Assess feasibility — Check ceiling height (7 ft minimum), moisture levels, and existing plumbing rough-ins
- Plan your layout — Map fixture locations, plan drainage, and choose a plumbing system
- Pull permits — Required for plumbing, electrical, and framing in virtually every US jurisdiction
- Rough-in plumbing and electrical — The most complex phase; hire licensed pros for this
- Frame, waterproof, and finish — Insulation, moisture-resistant drywall, tile, fixtures, and final trim
Average cost: $8,000 to $15,000 | ROI: Adds $15,000 to $40,000 in resale value in most markets
Your basement is already there. The square footage exists. But without a bathroom, it stays a space people only visit when they have to — then quickly leave to go back upstairs.
A basement bathroom changes that. It turns a utility floor into a livable one. And in the Chicago area, where finished basements are a serious selling point, it’s one of the highest-return projects you can take on.
The challenge? Basements sit below grade. That means you can’t rely on simple gravity to drain waste the way above-ground bathrooms do. You’ll need to think carefully about:
- Drainage — breaking concrete or using an upflush/macerating system
- Moisture — waterproofing before you build, not after
- Permits and code — required inspections at multiple stages
- The right trades — licensed plumbers and electricians are non-negotiable here
According to industry data, a mid-range bathroom addition recovers about 54% of its cost at resale, and a full bath addition can boost home value by as much as 20%. Even a basic half-bath adds roughly 10%.
This guide walks you through the entire process — from that bare concrete floor to a finished, functional bathroom your family and guests will actually use.
I’m Norbert, lead contractor at Smart City Renovation, a Des Plaines-based general contractor with 25 years of Chicagoland construction and remodeling experience — including dozens of basement bathroom additions across Chicago, Park Ridge, Niles, and the surrounding suburbs. Whether you’re planning to add a bathroom to a basement yourself or hire it out, the steps and insights below will help you get it right the first time.

Is it Worth the Investment? Assessing Value and Feasibility
When we talk to homeowners in Skokie or Arlington Heights, the first question is always: “Is this worth the headache?” The answer is a resounding yes, but with a few caveats.
From a financial perspective, a basement bathroom is a powerhouse. While a mid-range bathroom addition recovers about 54% of its direct cost, the broader impact on your home’s marketability is huge. In April 2026, buyers are looking for “turn-key” living. A basement without a bathroom is just a storage room; a basement with a full bath is a guest suite, a rental unit, or a high-end entertainment hub. Estimates show that adding a bathroom here can increase your total home value by 10% to 20%.
However, feasibility isn’t just about money; it’s about the physical constraints of your home. Before you pick out tile, we have to look at the “bones” of your basement:
- Ceiling Height: Most local building codes (including those in Mount Prospect and Glenview) require a minimum of 7 feet for habitable space. If your ductwork or beams are lower, you might need to get creative with your layout.
- Moisture Assessment: If your basement smells like a gym locker or has white powdery “efflorescence” on the walls, we need to fix the foundation first. Installing a bathroom in a damp basement is an expensive mistake that leads to mold behind your beautiful new walls.
- Existing Rough-ins: If you’re lucky, your builder already installed “rough-in” plumbing (pipes sticking out of the concrete). This can save you upwards of $1,000 to $2,000 in labor and excavation costs.
| Bathroom Type | Average Cost (2026) | Estimated Value Increase |
|---|---|---|
| Half-Bath (Toilet/Sink) | $8,000 – $15,000 | 10% |
| Full-Bath (Tub or Shower) | $15,000 – $28,000 | 20% |
| High-End Spa Bath | $30,000+ | Variable |
Assessing Your Basement’s Suitability
Beyond the height, we have to look at the “wet” logistics. If you plan on having a bedroom in the basement alongside the bathroom, you’ll need egress windows for safety. For the plumbing itself, gravity is your best friend or your worst enemy. Standard drain lines need a slope of 1/8 inch per foot to keep things moving. If your main sewer line exits the house high up on the wall, we’ll need to talk about pumps.
If you aren’t sure where to start, consulting an interior construction contractor can help you map out the structural possibilities before you commit to a design.
Cost Breakdown and Budgeting Strategies
Budgeting to add a bathroom to a basement requires a realistic look at both visible finishes and invisible infrastructure. On average, homeowners spend between $8,000 and $15,000, though high-end projects in areas like Northbrook or Glenview can easily exceed $25,000.
Labor typically accounts for 50% to 60% of the total project cost. Because basement work involves specialized skills—like cutting through concrete or navigating tight electrical junctions—this isn’t the place to hunt for the “cheapest” quote. We always recommend a 10-15% contingency fund for the “surprises” that inevitably hide behind basement walls or under concrete slabs.
Working with an experienced remodeler ensures that these costs are managed efficiently from day one.
Budgeting to Add a Bathroom to a Basement
Here is a more granular look at where the money goes:
- Rough Plumbing: $1,000 to $10,000. This is the widest variable. If we have to jackhammer the floor and install a sewage ejector pit, you’ll be on the higher end.
- Electrical Wiring: $500 to $2,500. This includes GFCI outlets (mandatory), lighting, and the all-important exhaust fan.
- Fixtures and Finishes: $2,000 to $5,000. This covers your vanity, toilet, shower pan, and tile.
- Permits: $300 to $800. Never skip these. Unpermitted bathrooms are a liability when you try to sell your home.
For a deeper dive into current trends and pricing, check out this Basement Bathroom Guide: How to Add a Bathroom the Right Way (2026) | The Basement Guide.
How to Add a Bathroom to a Basement: Solving the Plumbing Puzzle

Plumbing is the “make or break” element of a basement project. In a standard upstairs bathroom, waste falls down. In a basement, the waste often needs to go up or across a flat plane to reach the municipal sewer line.
The traditional method involves breaking the concrete slab. This requires a jackhammer, a lot of dust, and some heavy lifting. We dig trenches for the drain pipes, ensuring that 1/8-inch slope, and then connect them to the main line. We also have to install a “vent stack” that goes all the way through your roof (or connects to an existing one) to prevent sewer gases from entering your home.
This is precision work. A mistake in the pitch of a pipe under concrete is a nightmare to fix later. This is why we insist on using a licensed plumber for the rough-in phase.
Alternatives to Breaking Concrete
If the thought of jackhammers in your basement makes you cringe, there are “upflush” or macerating systems. Brands like Saniflo offer units that sit right on top of the concrete.
- Macerating Toilets: These work like a garbage disposal for your bathroom. They grind up waste and pump it through small-diameter PEX or PVC piping (often just 3/4-inch to 1-inch) up to your sewer line.
- Sewage Ejector Pumps: These involve a small pit dug into the floor that collects waste from the toilet, sink, and shower, then pumps it up to the main drain.
These systems are often more DIY-friendly and can save thousands in floor demolition. You can see a detailed breakdown of these systems in this Step-by-Step Guide: How to Put a Bathroom in Basement.
The Step-by-Step Installation Process
Once the plumbing plan is set, the actual construction begins. At Smart City Renovation, we follow a strict order of operations to ensure code compliance and longevity.
- Permits and Planning: We submit drawings to your local building department (e.g., Des Plaines or Rosemont).
- Framing: We use pressure-treated lumber for the bottom plates that touch the concrete. This prevents rot from the natural moisture found in basement floors.
- Rough-ins: Plumbers and electricians run their lines through the studs.
- Inspections: The city inspector must see the plumbing and electrical before the walls are closed.
- Waterproofing: This is the most skipped—and most important—step.
- Finishing: Drywall, tile, paint, and fixture installation.
A general contractor coordinates all these moving parts so you don’t have to play “phone tag” with five different subcontractors.
Planning Your Layout to Add a Bathroom to a Basement
Layout is everything in a tight space. We recommend a “wet wall” design, where the toilet, sink, and shower all share the same wall of plumbing. This keeps costs down and simplifies venting. When framing, we often use 2×6 studs for this wall to accommodate the larger 3-inch drain pipes without weakening the structure.
Don’t forget the “swing.” Make sure your door doesn’t hit the toilet or vanity when it opens. For more layout tips, see this How to Add a Bathroom to a Basement: Step-by-Step Guide from Start to Finish.
Electrical, Waterproofing, and Finishing
Electrical safety is paramount. Every outlet in a basement bathroom must be GFCI protected. For lighting, we love layered options: bright LED recessed lights for the whole room and vanity lights for the mirror.
For waterproofing, we use products like Kerdi board or cement board with a waterproof membrane in the shower. Standard drywall—even the “green” moisture-resistant kind—is not enough for a basement shower. It will eventually fail. We prefer PEX piping for water lines because it’s flexible, resistant to scale buildup, and much faster to install than traditional copper.

Preventing Moisture and Maximizing Small Spaces
The biggest enemy of a basement bathroom is humidity. Without proper airflow, your new investment will become a breeding ground for mold within a year.
- Exhaust Fans: You need a fan rated for at least 50 CFM (Cubic Feet per Minute), but we usually recommend 80-100 CFM for basements.
- Direct Venting: The fan must vent directly outside. Never, ever vent a basement fan into the joists or another part of the basement.
- Vapor Barriers: Installing a vapor barrier between the concrete and your flooring or behind your drywall helps keep ground moisture out of your living space.
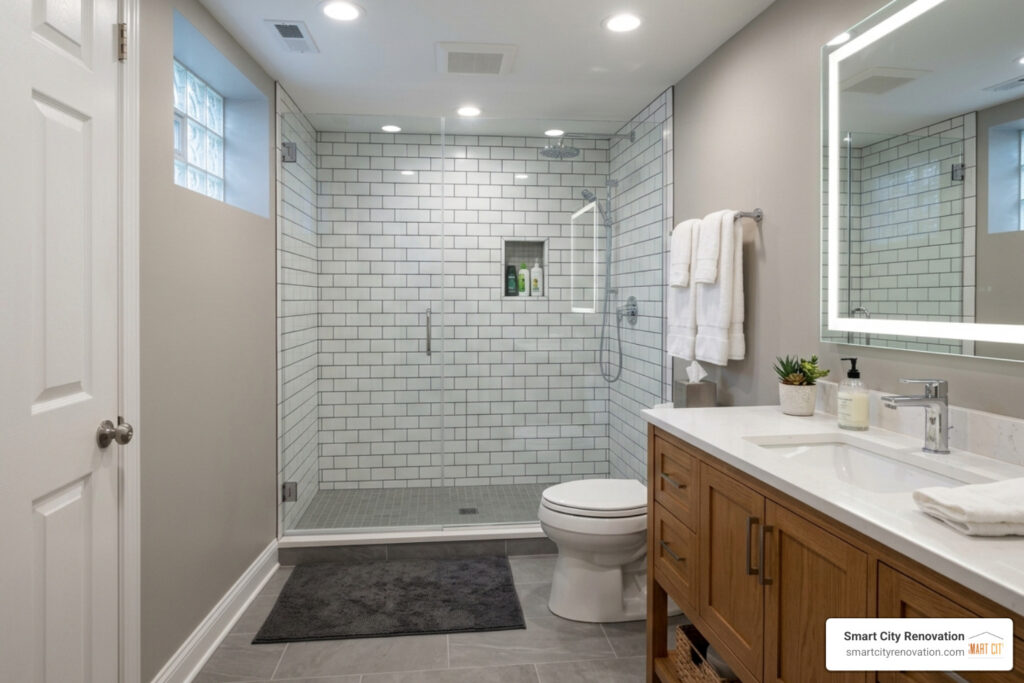
Design Ideas for Small Basement Bathrooms
Since most basement bathrooms are “tucked away,” they tend to be small. But small doesn’t have to feel like a dungeon.
- Corner Showers: These save significant floor space compared to standard tubs.
- Floating Vanities: By showing more of the floor, the room feels larger.
- Pocket Doors: If you don’t have room for a door to swing, slide it into the wall.
- Neutral Colors: Light grays, whites, and tans reflect light and open up the space.
Frequently Asked Questions about Basement Bathrooms
Can I add a basement bathroom without breaking the concrete floor?
Yes! As mentioned earlier, macerating toilets (like those from Saniflo) and upflush systems allow you to install a full bathroom entirely above the concrete. The waste is pumped upward through small pipes that can be hidden behind walls. This is a great, cost-effective alternative for older homes in places like Niles or Park Ridge where the slab is particularly thick or difficult to reach.
How long does it typically take to add a bathroom to a basement?
A professional installation typically takes 4 to 8 weeks. This includes the time for permit approval (1-3 weeks), the rough-in phase, and the drying times for mud, paint, and tile grout. DIY projects often take longer—anywhere from 3 to 6 months—depending on your weekend availability.
What are the most important building codes for basement bathrooms?
While codes vary by municipality (like Schaumburg vs. Elk Grove Village), the big three are:
- Ceiling Height: Usually 7 feet minimum.
- Ventilation: A mechanical exhaust fan vented to the exterior is almost always required.
- Electrical: All outlets must be GFCI and within 6 feet of a water source.
- Egress: If the basement is being used as a bedroom suite, you must have a secondary exit (egress window).
Conclusion
Adding a bathroom to a basement is a journey from a cold concrete corner to a warm, functional part of your home. It’s a project that pays for itself in convenience today and resale value tomorrow. But because you’re working against gravity and moisture, the margin for error is slim.
At Smart City Renovation, we’ve spent 25 years perfecting the art of the basement transformation. From the initial plumbing rough-in to the final coat of mildew-resistant paint, we bring professional oversight to every square inch. We serve the entire Chicagoland area, including Hoffman Estates, Palatine, Buffalo Grove, and beyond.
Don’t let your basement stay a “half-finished” thought. Let us help you build a space that adds real value to your life and your property.
Start your basement transformation today with Smart City Renovation