
Is Your Bathtub Drain Leaking, Clogged, or Broken? Here’s What to Do
Bathroom tub drain replacement is one of the most common DIY plumbing fixes homeowners tackle — and for good reason. A worn or leaking drain can cause water damage to floors, ceilings, and walls if left alone.
Here’s how to replace a bathtub drain (quick overview):
- Identify your drain type (lift-and-turn, toe-touch, trip-lever, or tip-toe)
- Gather tools — drain wrench, plumber’s putty, screwdriver, channel locks
- Remove the old stopper, then unscrew the drain flange counterclockwise
- Clean the seating surface and inspect the drain shoe for damage
- Apply plumber’s putty under the new flange and thread it in by hand
- Tighten a quarter-turn past hand-tight — don’t overtighten
- Reconnect the overflow plate and run a double leak test
Most homeowners complete the job in 30–60 minutes for around $20–$50 in materials. A professional plumber typically charges $150–$350 for the same repair.
A leaky drain isn’t just annoying — persistent moisture from plumbing leaks is a common cause of indoor mold growth, according to the CDC. The sooner you fix it, the better.
I’m Norbert, general contractor and founder of Smart City Renovation, with 25 years of Chicagoland construction experience — including hundreds of bathroom tub drain replacement projects across Chicago, Des Plaines, Park Ridge, and Niles. In this guide, I’ll walk you through every step so you can get it done right the first time.

Understanding Bathtub Drain Types and Assemblies
Before you head to the local hardware store in Mount Prospect or Glenview, you need to know exactly what kind of drain assembly is currently installed in your tub. While they all serve the same purpose—keeping water in the tub when you want a soak and letting it out when you are done—their mechanical designs differ significantly.
There are four primary styles of bathtub drain stoppers you will encounter:
- Lift-and-Turn: This style has a small knob on top of the drain stopper. You lift the stopper and turn it in opposite directions to lock it open or closed. It is highly reliable because of its mechanical simplicity.
- Toe-Touch (or Toe-Tap): These are spring-loaded stoppers. You simply push down on the stopper with your foot to click it closed, and push it again to release it. They are extremely popular and DIY-friendly to install.
- Tip-Toe (or Push-Pull): Similar to a lift-and-turn, but you do not need to twist it. You simply push down to close and pull up to open.
- Trip-Lever: This classic design does not have a visible mechanism on the drain itself. Instead, a lever on the overflow plate (the metal circle higher up on the tub wall) operates an internal plunger or linkage assembly that blocks the water flow from inside the waste pipe.
To identify your current drain, look at how the stopper behaves. If there is a lever on your overflow plate, you likely have a trip-lever style. If there is a stopper sitting directly in the drain flange that you physically push, pull, or twist, you have one of the other three.
If you are dealing with a trip-lever system that has stopped working, it often comes down to an adjusted or corroded linkage. In older homes across Niles and Park Ridge, we often recommend upgrading to a modern toe-touch or lift-and-turn style because they eliminate the need for complicated internal linkages that catch hair and soap scum over time.
| Drain Style | Operation Method | DIY Difficulty | Reliability | Key Advantage |
|---|---|---|---|---|
| Lift-and-Turn | Lift and twist knob | Very Easy | High | Few moving parts to break |
| Toe-Touch | Press down with foot | Very Easy | Moderate | Convenient, hands-free operation |
| Tip-Toe | Push down / Pull up | Very Easy | High | Simple mechanical design |
| Trip-Lever | Flip lever on overflow plate | Moderate to Hard | Moderate | Clean look, no stopper in the way |
Choosing the Right Kit for Your Bathroom Tub Drain Replacement
Choosing a replacement kit is more than just matching the shiny chrome or matte black finish of your faucet. You must ensure the new kit is physically compatible with your tub’s existing plumbing.
First, pay attention to thread size. Most standard modern bathtubs use a 1-1/2 inch drain pipe, but some older tubs (common in vintage homes throughout Evanston and Wilmette) might feature a 1-3/8 inch thread size. Many replacement kits sold at home improvement centers include an adapter bushing with dual-thread configurations, allowing them to fit both sizes. Always double-check the product packaging.
Second, consider the material: brass vs. PVC.
- Brass waste-and-overflow kits are incredibly durable and can last 40 to 70 years. They are highly recommended if your plumbing is exposed (such as with a freestanding clawfoot tub) or if you want a premium, long-term solution.
- PVC kits are more affordable, easier to cut and glue, and have an expected lifespan of 25 to 40 years. They are the standard choice for modern alcove tub installations.
If you are planning a larger bathroom upgrade, matching your finishes is crucial. Popular choices in 2026 include brushed nickel, matte black, and classic polished chrome. If you want to dive deeper into coordinating your fixtures, check out A Comprehensive Guide to Bathroom Remodeling for expert design and material tips.
Tools and Materials Needed for the Project
Do not start this project without having all your tools lined up. There is nothing worse than sitting on your bathroom floor with a half-removed drain and realizing you have to run to the hardware store in Skokie or Morton Grove.

Here is your essential checklist:
- Tub Drain Remover Wrench (or Drain Key): This specialized tool fits into the crossbars of the drain flange to let you unscrew it easily.
- Screwdriver: A flathead and Phillips head screwdriver for removing the overflow plate and stopper screws.
- Plumber’s Putty: The traditional, code-compliant sealant used to create a watertight seal beneath the drain flange.
- Channel Lock Pliers: For tightening slip-joint nuts under the tub if you have access.
- Adjustable Wrench: For general tightening.
- Penetrating Oil (like WD-40): Essential for loosening old, rusted metal threads.
- Safety Gear: Work gloves and safety glasses to protect yourself from old debris and sharp metal edges.
Step-by-Step Guide to Removing the Old Drain
Removing the old drain flange can be the most challenging part of a bathroom tub drain replacement, especially if it has been in place for decades. Over time, mineral deposits and old putty can practically weld the metal threads together. For a detailed visual breakdown, you can read How To Replace a Tub Drain – This Old House to see how the pros approach it.
How to Prep for a Bathroom Tub Drain Replacement
Before touching any tools, make sure your work area is ready:
- Shut Off the Water: While you are not working directly on pressurized water lines, it is always a safe practice to turn off the water supply to the bathroom to prevent accidental leaks.
- Protect the Tub Surface: Lay down a heavy towel or apply painter’s tape around the drain. A dropped heavy wrench can easily chip porcelain or crack fiberglass, turning a simple drain swap into a costly tub repair.
- Clean the Area: Clear out any standing water, soap scum, or hair around the drain so your tools can grip properly.
Removing a Stubborn or Seized Drain Flange
Once the stopper is removed (usually by unscrewing the top knob or loosening a small set screw underneath the cap), you will see the metal flange with crossbars inside.
- Insert your drain wrench into the crossbars. Use an adjustable wrench or screwdriver slipped through the drain wrench handles to get leverage, and turn counterclockwise.
- If the flange refuses to budge, spray it generously with penetrating oil and let it sit for 15–20 minutes.
- What if the crossbars break? This is a very common issue with old brass drains. If the crossbars crumble, a standard drain wrench won’t work. Instead, you will need a drain key—an expanding tool that grips the smooth interior walls of the flange when turned. You can see this rescue technique demonstrated in this video on How to Replace a Tub Drain | Ask This Old House – YouTube.
How to Install Your New Bathtub Drain Kit
With the old flange removed, you are ready to install the clean, leak-free upgrade.
Installing the New Bathroom Tub Drain Replacement Flange
- Clean the Seating Surface: Thoroughly scrape away all remnants of old plumber’s putty or silicone from the tub surface. The area must be completely clean and dry.
- Inspect the Rubber Gasket: Underneath the tub, the drain pipe (called the drain shoe) has a thick black rubber gasket. If this gasket is cracked, dry-rotted, or misaligned, it will leak. Reach under the tub (if you have access) and replace this gasket with the new one from your kit. If you don’t have access from below, ensure the existing gasket is sitting flat and centered directly beneath the tub’s drain hole.
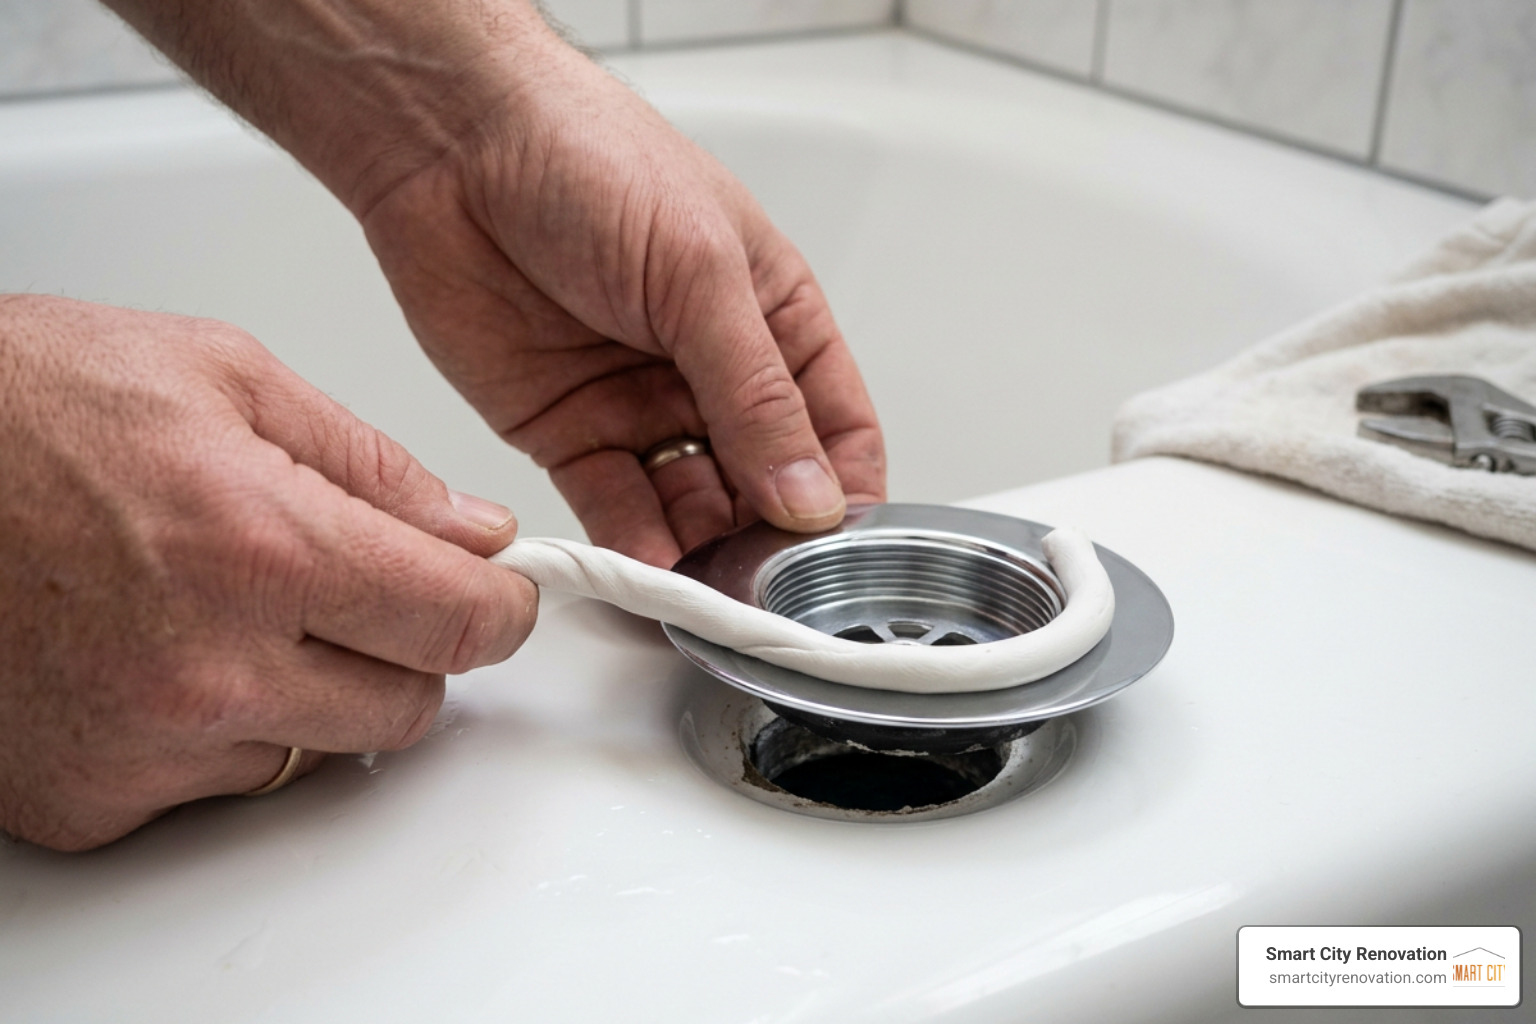
- Apply Plumber’s Putty: Roll a piece of plumber’s putty between your hands to create a uniform “rope” about the thickness of a pencil. Wrap this rope around the underside of the new drain flange.
- Thread and Tighten: Carefully insert the flange into the drain hole. Always start threading by hand to prevent cross-threading, which can ruin the plastic threads of the drain shoe underneath. Once hand-tight, use your drain wrench to tighten it.
- Don’t Overdo It: Tighten the flange until it is snug and the rubber gasket underneath compresses slightly. Putty should squeeze out evenly around the edges. Over-tightening can crack acrylic or fiberglass tubs. Wipe away the excess putty.
For a deeper dive into ensuring a watertight seal, read Replacing Tub Drain: Step-by-Step DIY Guide for a Leak-Free Install – MonBlari.
Once the flange is secured, attach your new overflow plate and stopper mechanism. Finally, perform a double leak test: fill the tub with a few inches of water to check the flange seal, then release the water while checking underneath (or through an access panel) to ensure the waste pipes handle the flow without a single drip.
Frequently Asked Questions About Bathtub Drain Replacement
How much does a typical tub drain replacement cost in 2026?
In 2026, a DIY bathroom tub drain replacement is highly cost-effective. A standard high-quality replacement kit costs between $20 and $50, and basic tools (like a drain wrench and plumber’s putty) will run you another $15 to $30.
If you prefer to hire a professional plumber in the Chicagoland area—whether you are in Des Plaines, Mount Prospect, or Arlington Heights—expect to pay between $150 and $350 for labor and materials. If your existing plumbing is highly corroded or requires cutting through walls to access the pipes, the price can increase.
When should I call a professional plumber instead of DIY?
While a simple flange and stopper swap is a great DIY project, you should call in the professionals if you run into any of the following:
- Lead or Galvanized Pipes: Older homes in historic areas of Park Ridge or Niles often have outdated metal piping. Disturbing these can cause widespread leaks or health hazards.
- Extensive Corrosion: If the drain shoe or waste tee underneath the tub crumbles when you touch it, the entire waste-and-overflow assembly must be replaced from behind or beneath the tub.
- Multi-Family Condo Logistics: If you live in a high-rise condo in Rosemont or a shared building in Skokie, a leak can quickly damage your neighbor’s ceiling. Additionally, concrete subfloors make accessing drain lines highly complex.
If your project involves more extensive bathroom work, like adding plumbing below a concrete slab, read our guide on From Concrete to Commode: Building a Bathroom in Your Basement to understand the structural demands.
Should I use plumber’s putty or silicone to seal the flange?
For most standard cast iron, steel, or heavy acrylic tubs, plumber’s putty is the industry standard. It is easy to work with, creates a reliable seal, and can be easily cleaned up or removed in the future.
However, if you have a specialty stone, composite, or certain modern acrylic tubs, check the manufacturer’s guidelines. Petroleum-based plumber’s putty can stain these materials. In those specific cases, a non-staining putty or 100% silicone sealant is recommended. Silicone is much harder to clean up and remove if you ever need to replace the drain again down the road.
Conclusion
A successful bathroom tub drain replacement is a fantastic way to eliminate leaks, improve your tub’s drainage, and refresh the look of your bathroom fixtures. By identifying your drain type, using the right tools, and taking care not to over-tighten the new flange, you can achieve a professional-grade, leak-free seal on your own.
Of course, plumbing projects don’t always go as planned. If you run into rusted pipes, broken crossbars, or suspect a hidden leak behind your walls, don’t sweat it.
With 25 years of trusted general contracting and plumbing expertise across the Chicagoland area—including Des Plaines, Mount Prospect, Park Ridge, Niles, and Glenview—Smart City Renovation is here to help. Schedule a professional plumber with us today to handle your plumbing needs quickly, cleanly, and with a guaranteed waterproof finish!