
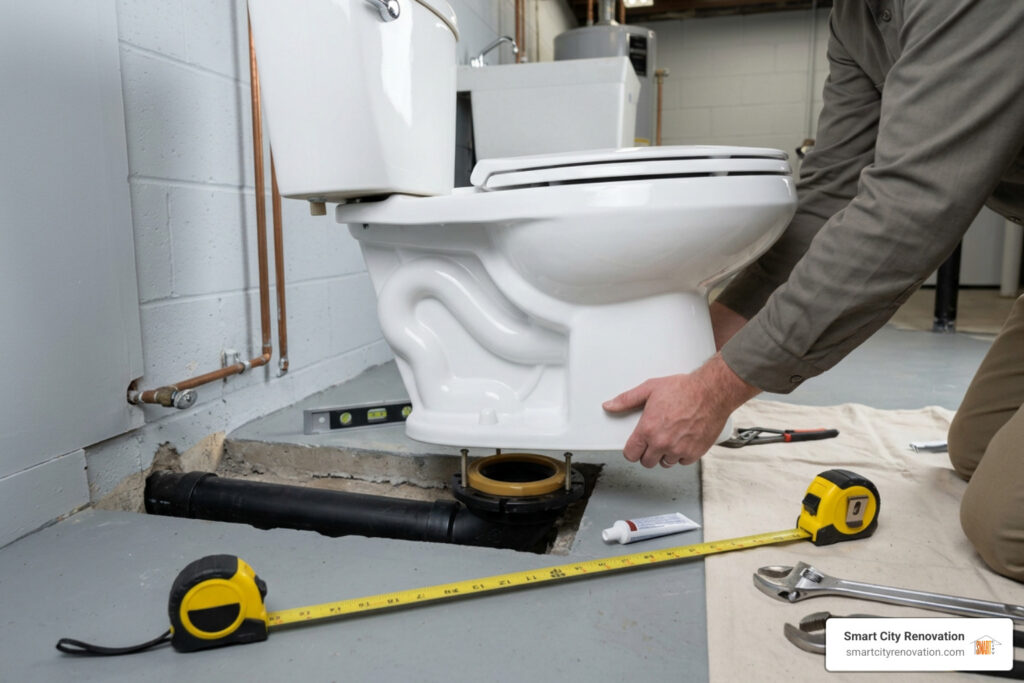
Adding a Toilet Starts With the Right Plan
Adding a toilet can mean a simple replacement in an existing bathroom or a new half bath in a basement, closet, or unused corner. The quick answer: measure the space and rough-in first, confirm how waste will drain and vent, check local permit rules, then choose between standard gravity plumbing and an upflush system.
- Replacing an existing toilet: This is often a manageable DIY job when the flange, drain, and water line are already in place.
- Adding a toilet in a new location: This usually requires new drain, vent, and supply plumbing, plus permits and inspections.
- Adding one below grade or far from a drain stack: An upflush or sewage-ejector system may avoid cutting through a concrete slab.
- Planning the budget: A half bath commonly costs about $5,000 to $25,000, while a full bath can range from $15,000 to $50,000 or more, depending on plumbing access and finishes.
A well-planned bathroom addition can make daily life easier and improve resale appeal, especially in a one-bath home. But the hidden details matter: a wrong rough-in measurement, low flange, missing vent, or poor seal can turn a small project into expensive water damage.
I’m Norbert with Smart City Renovation, and after 25 years of Chicagoland remodeling work, I have seen how careful measuring, code-ready plumbing, and solid coordination make adding a toilet far less stressful. Whether you are replacing a fixture or creating a new bathroom, the next steps will help you plan the job with confidence.
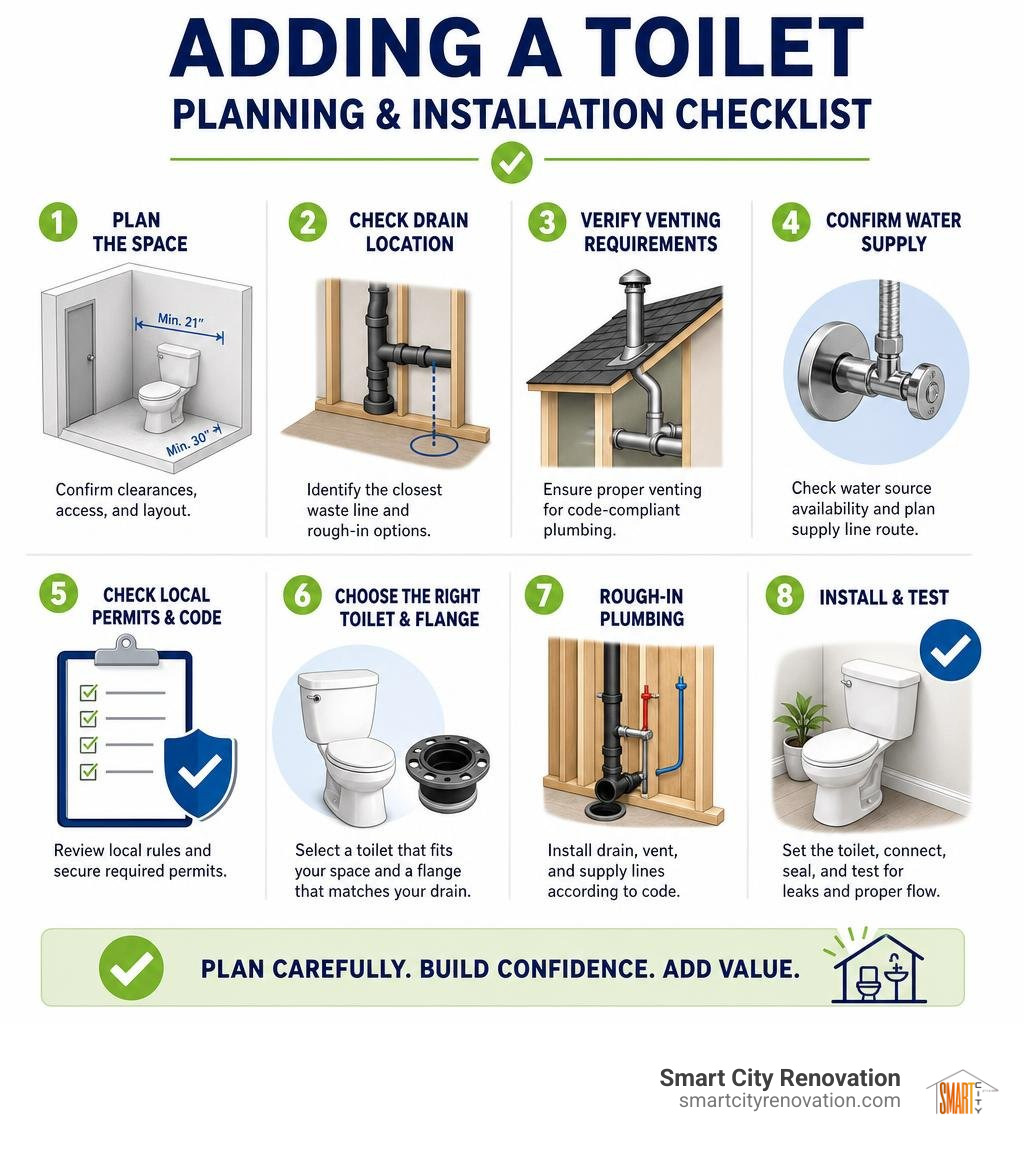
Planning and Measuring for Adding a Toilet
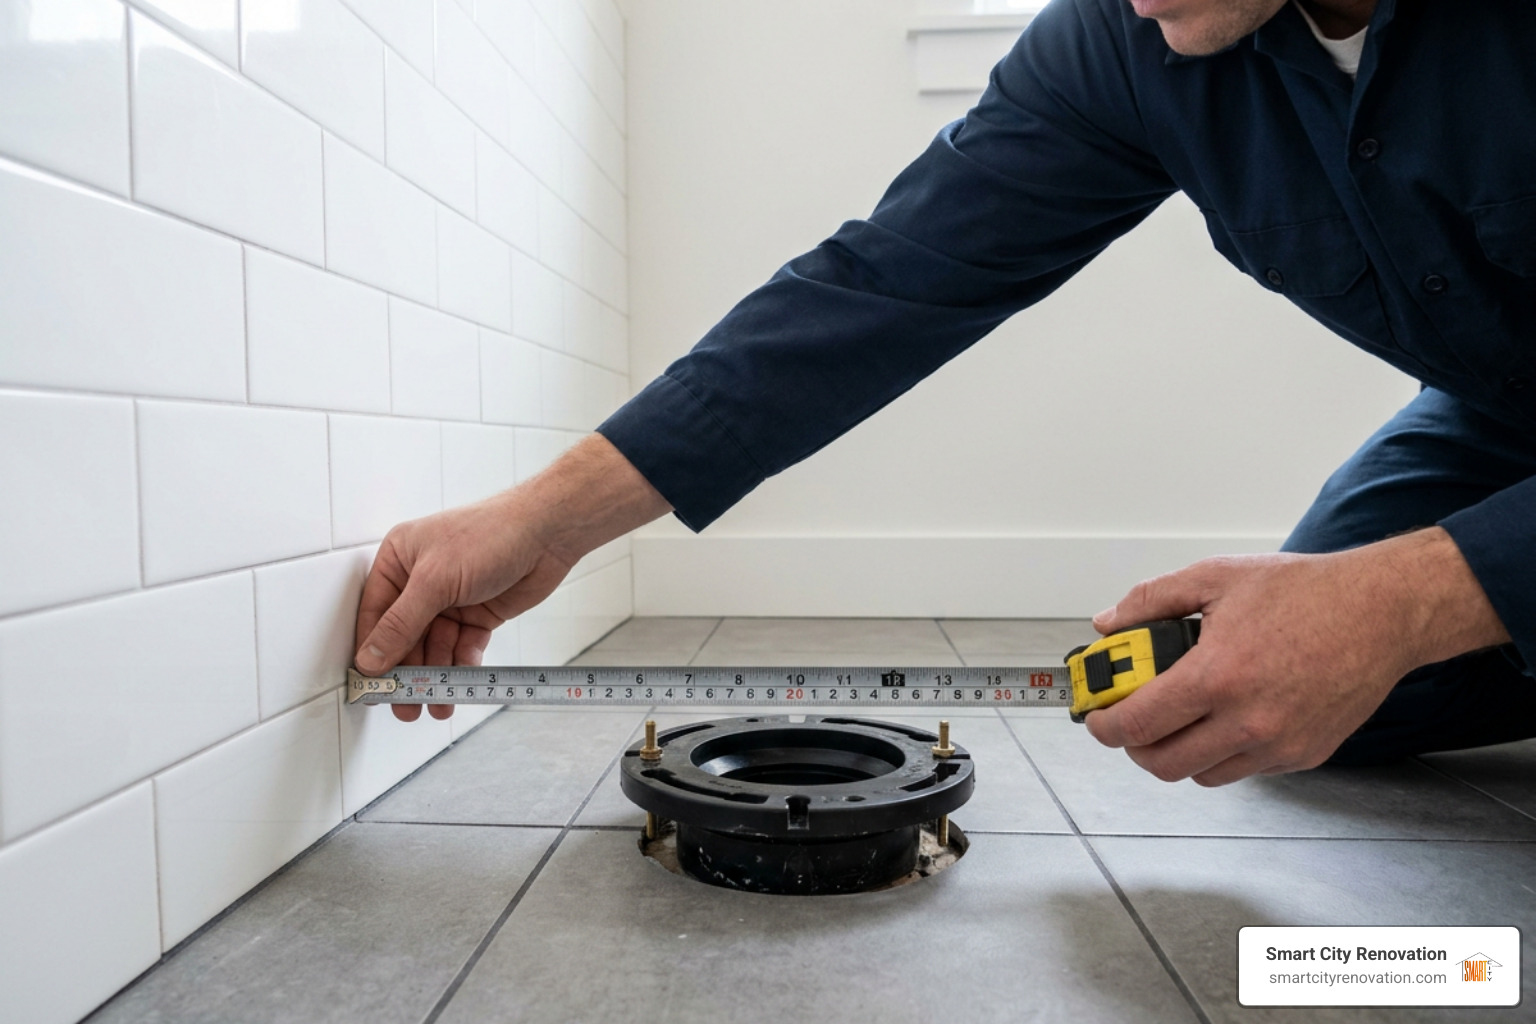
Before you purchase fixtures or unbox any plumbing tools, accurate physical measurements are your highest priority. The single most common mistake homeowners make when adding a toilet is purchasing a fixture without properly checking the rough-in distance.
The rough-in size is the distance from the finished wall (the drywall or tile surface) to the center of the closet flange bolt holes. Standard rough-in clearance in North American residential plumbing is exactly 12 inches. However, older homes across Park Ridge, Evanston, or Skokie may occasionally feature 10-inch or 14-inch rough-in setups.
Pro Tip: Always measure from the finished wall surface, never from the baseboard or shoe molding! Measuring to the baseboard introduces a half-inch to three-quarter-inch error that can make placing your new toilet physically impossible.
Beyond the rough-in, evaluate bowl shape and surrounding clearance:
- Elongated Bowls: Extend roughly 18.5 inches from the mounting holes. They offer superior ergonomic comfort but require extra room in front of the bowl.
- Round Bowls: Extend roughly 16.5 inches from the mounting holes, making them ideal for compact powder rooms or tight closet conversions.
- Code Clearances: Standard plumbing code (IPC/UPC) requires at least 21 inches of clear space in front of the bowl and 15 inches from the center of the toilet to any side wall or fixture.
To understand the broader structural considerations when expanding your home’s footprint or reconfiguring rooms, read our comprehensive How to Add a Bathroom: Planning, Permits, and Cost for a New Half or Full Bath guide alongside The Ultimate Bathroom Addition Cost Guide For Homeowners.
Permits and Location Options for Adding a Toilet
When adding a toilet in a brand-new spot—such as converting a main-floor coat closet, reclaiming under-stair storage, or finishing a lower level—location determines the complexity of your plumbing lines.
Under the International Residential Code (IRC), a functional half bath requires a minimum footprint of 11 square feet. However, creating a comfortable space generally works best around 18 to 30 square feet. Choosing a space directly adjacent to or above existing “wet walls” (walls containing main drain stacks and supply pipes) drastically lowers labor costs.
Building codes and permitting rules are essential:
- Permits: Replacing an existing toilet like-for-like usually requires no permit. However, extending drain lines, running new supply lines, or tapping into main soil stacks requires building and plumbing permits issued by your local municipality (such as Des Plaines, Schaumburg, or Glenview).
- Venting: Every toilet drain pipe must be properly vented to maintain safe pressure balances and prevent toxic sewer gas from entering your living space.
- Slope Requirements: Gravity drain pipes must maintain a precise downward slope of 1/4 inch per foot toward the main house drain.
If you are exploring a basement layout, explore our guide on Adding A Downstairs Toilet The Ultimate Guide To Your New Throne Room to see how space planning works in practice.
Upflush Systems vs Gravity Plumbing when Adding a Toilet
When adding a toilet in locations below the main sewer line level—or where breaking through concrete floor slabs is cost-prohibitive—conventional gravity plumbing isn’t always feasible.
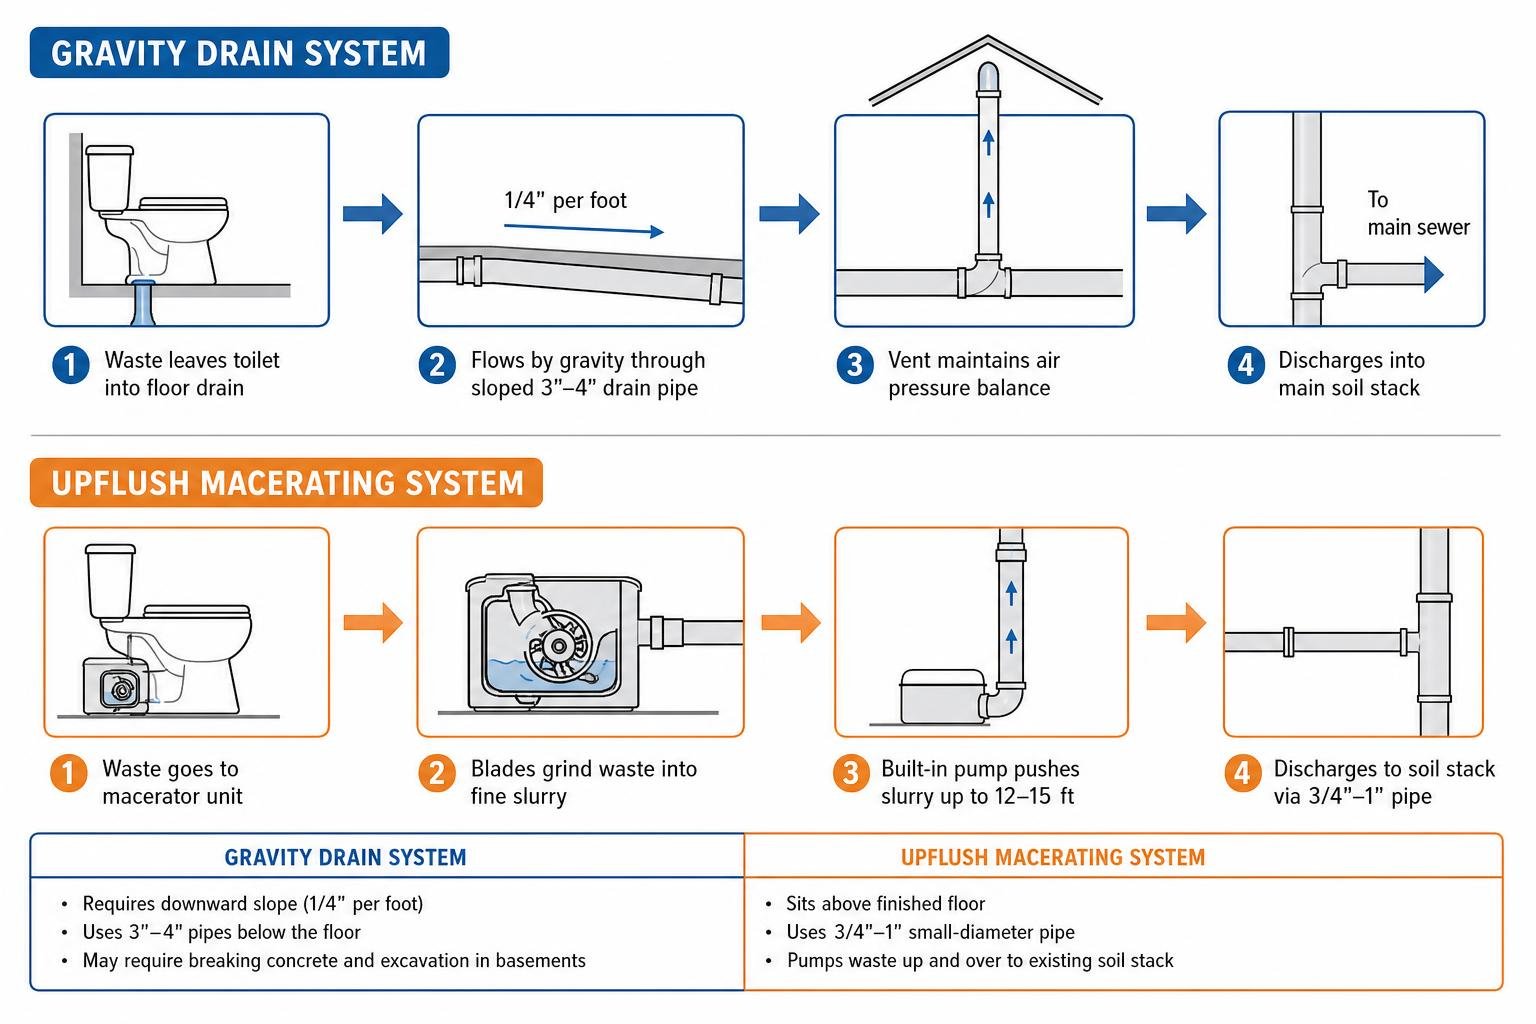
Here is how upflush macerating technology compares to traditional gravity plumbing:
- Traditional Gravity Plumbing: Relies on natural downward slope. In basements, this requires jackhammering concrete slabs, excavating soil, laying 3-inch or 4-inch PVC drain pipes, and repouring concrete ($2,000 to $5,000+ just for earthwork).
- Upflush (Macerating) Systems: Sits entirely above the finished floor. The toilet discharges waste into a small sealed pump unit behind the bowl. Stainless steel rotating blades grind waste and toilet paper into fine slurry, pumping it vertically up to 12–15 feet and horizontally over 100 feet through small-diameter (3/4-inch or 1-inch) discharge pipe into the nearest soil stack.
Upflush systems eliminate floor destruction, cutting basement bathroom installation costs by up to 50–70%. To review how to tie new lines into existing drain stacks correctly, consult How To Add A Toilet To Existing Plumbing? A Step By Step Guide.
Essential Tools and Materials Needed for Installation
Having the proper tools on hand makes replacing or adding a toilet a smooth, stress-free afternoon project. Gather these basic materials before turning off your water shutoff valve:

- Core Equipment & Safety: Safety glasses, rubber gloves, bucket, sponge, disposable plastic putty knife, and shop towels or old rags.
- Flange & Seal Accessories: New closet bolts (brass bolts with plastic retainer washers), a high-quality wax ring (or extra-thick wax ring with polyethylene horn if your flange sits below floor level), and flange repair spacers (if applicable).
- Hand Tools: Adjustable wrench (or deep-well socket set), 9-inch torpedo level, utility knife, carpenter pencil, tape measure, and plastic toilet shims.
- Plumbing Supplies: Flexible braided stainless steel water supply hose (typically 3/8-inch compression to 7/8-inch toilet fill valve), water solidifier powder (optional, to instantly gel standing trap water for spill-free removal), and 100% silicone bathroom caulk.
Step-by-Step Guide: How to Install a New Toilet
Now that your planning, measurements, and tools are lined up, let’s look at the mechanical process of setting your fixture step by step.
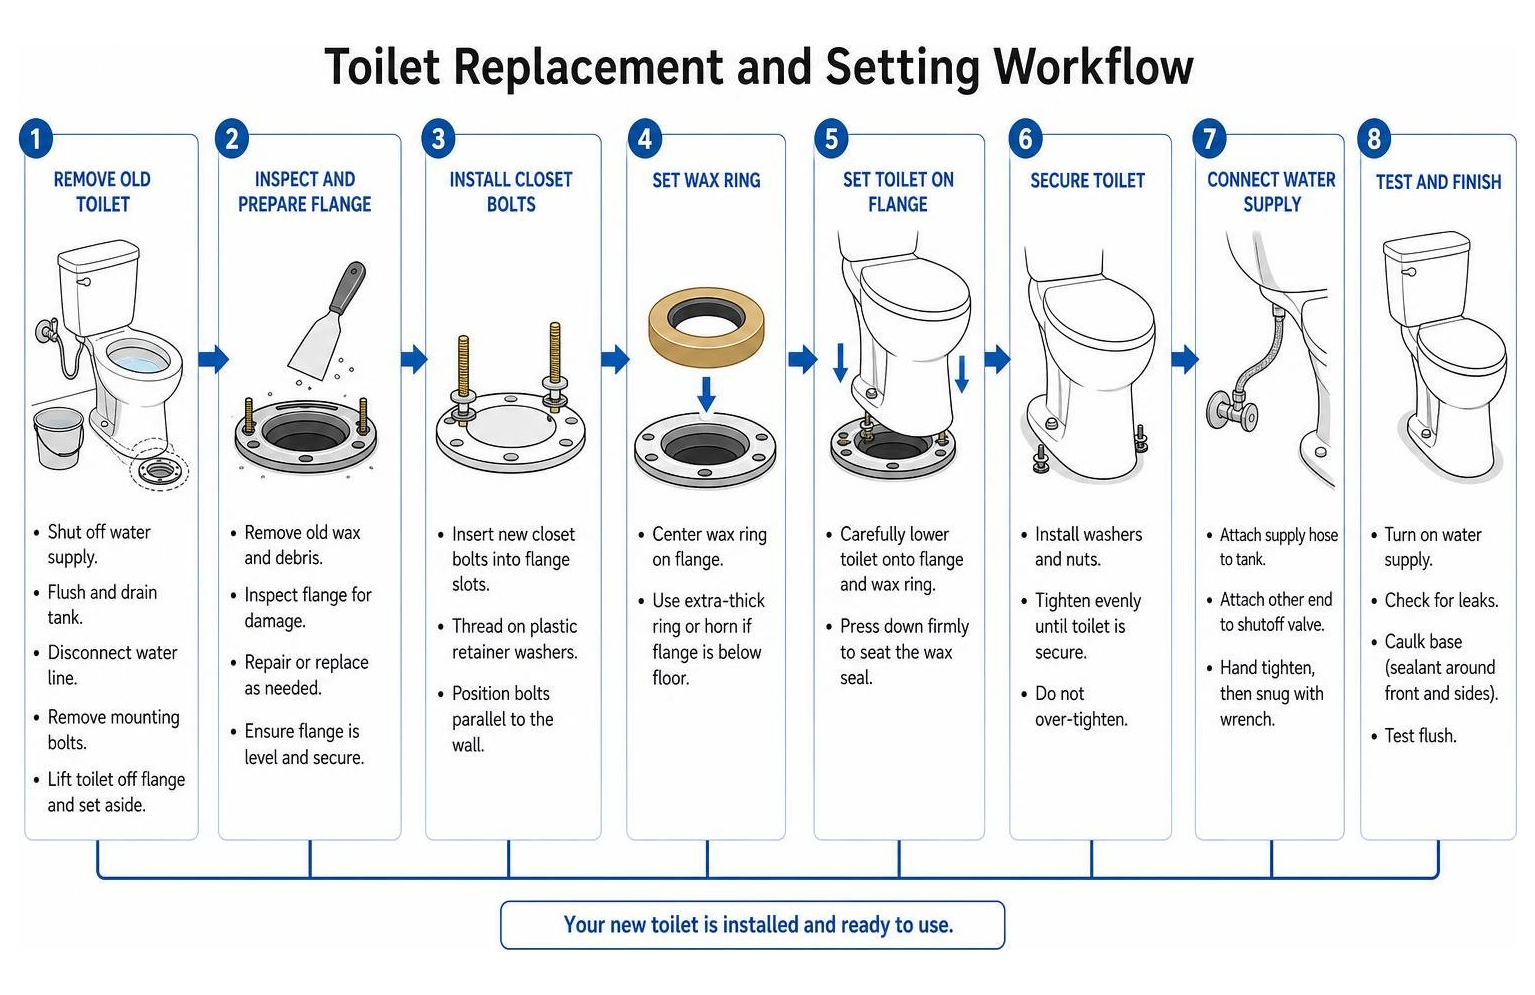
Step 1: Remove the Old Toilet and Prepare the Flange
If you are replacing an existing fixture, begin with clean removal:
- Shut Off Water and Drain: Close the shutoff valve located on the wall behind the toilet clockwise. Flush the toilet and hold the handle down until the tank drains completely.
- Remove Residual Water: Sponge out remaining water from both the tank and the bottom of the bowl. Alternatively, sprinkle a packet of water solidifier into the bowl water, wait 5 minutes until it turns into gel, and wipe it out clean.
- Disconnect lines: Unscrew the flexible water line from the tank inlet using your adjustable wrench.
- Unbolt and Lift: Remove trim caps at the floor base, unscrew brass closet nuts, and rock the bowl gently side-to-side to break the old wax seal. Lift the bowl off and set it aside on old towels or cardboard.
- Plug the Open Drain Pipe: CRITICAL STEP! Stuff an old rag or towel firmly into the open sewer pipe immediately. This blocks noxious, explosive sewer gases from entering your house and prevents dropped tools from falling down the stack.
- Clean and Inspect Flange: Scrape off old wax from the floor flange using a plastic putty knife. Inspect the closet flange for cracks or rust. The top ring of the flange should ideal sit 1/4 inch above the finished tile floor. If the flange sits flat with or below the floor surface, you will need an extra-thick wax ring or flange extender.
If you notice stubborn drainage slowdowns or backup issues while working on the flange, take a moment to read The Ultimate Guide To Spotting And Stopping A Main Drain Clog.
Step 2: Install New Flange Bolts and Wax Ring
- Position Closet Bolts: Slide new brass closet bolts into the keyhole slots on each side of the floor flange, threads facing straight up. Slide the plastic retaining washers down over the threads to hold the bolts perfectly upright and prevent them from wobbling.
- Draw Reference Lines (Optional Alignment Trick): Locate the center of each closet bolt and draw a faint pencil line outward onto the floor tile. This gives you a clear visual guide when hovering the heavy porcelain bowl over the floor.
- Apply the Wax Ring: You can place the wax ring in one of two places:
- Press the flat side of the wax ring firmly onto the bottom horn (outlet) of the inverted ceramic toilet bowl.
- Alternatively, press the wax ring evenly over the center of the floor flange.
- Note: If room temperatures are cold, let the wax ring sit in warm water for a few minutes to soften it. Soft wax molds and compresses much better under body weight.
Step 3: Set and Level the Toilet Bowl
- Remove the Sewer Rag: Pull the rag plug out of the drain opening! (Leaving the rag in place is a classic DIY mistake that blocks the drain completely).
- Lower the Bowl Straight Down: Hover over the bowl, align the base mounting holes with your floor pencil marks and closet bolts, and lower the bowl straight down onto the flange.
- Set with Body Weight: Do not twist, turn, or rock the toilet once the ceramic horn makes contact with the wax! Twisting tears the wax seal and guarantees a leak. Sit on the bowl or press down firmly with your full upper body weight for 10–15 seconds to compress the wax ring evenly.
- Level the Toilet: Place a torpedo level across the bowl from side to side, then front to back. If the bowl rocks or sits unevenly, slide firm plastic shims underneath the base gaps.
Step 4: Secure the Bowl, Tank, and Supply Line
- Install Bowl Hardware: Place plastic washer caps and brass nuts over the protruding closet bolts. Tighten the nuts evenly on each side using a wrench, alternating back and forth between left and right. > WARNING: Porcelain cracks easily under uneven pressure. Tighten nuts hand-tight plus one-quarter turn with a wrench. Never force or overtighten!
- Attach the Tank (for Two-Piece Toilets): Place the heavy rubber tank-to-bowl sponge gasket over the tank flush valve opening underneath. Carefully lower the tank onto the back ledge of the toilet bowl. Insert tank bolts through rubber washers inside the tank, and tighten the wingnuts or brass nuts underneath until the tank sits firm and level against the bowl.
- Connect Supply Line: Thread your new flexible braided stainless steel hose onto the bottom shank of the plastic fill valve underneath the tank. Hand-tighten firmly, then add a quarter turn with pliers.
Step 5: Test for Leaks and Apply Base Sealant
- Fill the System: Slowly turn the wall water shutoff valve counter-clockwise to restore water pressure. Check for immediate drops or drips at the shutoff valve and fill hose connection.
- Test Flush: Allow the tank to fill completely, then flush the toilet several times while inspecting all points with a dry flashlight:
- Tank-to-bowl gasket connection
- Supply line compression fittings
- Outer floor base ring
- Perform the 48-Hour Paper Towel Test: Tuck a clean, dry sheet of paper towel flat against the tile around the back floor base of the toilet. Leave it for 48 hours. If the wax ring has a silent, invisible leak, the paper towel will absorb moisture immediately, alerting you before subfloor water damage can occur.
- Apply Silicone Base Caulk: Once you have verified there are no leaks after 24–48 hours, trim excess plastic shims flush with a utility knife. Apply a neat bead of 100% waterproof silicone caulk around the front and sides of the base where the toilet meets the tile. Leave a small 1-inch uncaulked gap at the rear center. This gap allows any potential future wax failure to drain out onto the floor where you can see it, rather than trapping water under the porcelain to rot your subfloor. Smooth the caulk bead with a damp cloth or finger.
Project Costs and Common Installation Mistakes to Avoid
When budgeting for adding a toilet or building a complete bathroom, understanding material versus labor costs helps prevent budget surprises.

| Project Scope | DIY Finish Cost | Full Professional Contractor Hire | Key Infrastructure Elements |
|---|---|---|---|
| Simple Toilet Replacement | $150 – $450 | $350 – $800 | Fixture, wax seal, flex supply line, disposal |
| Half Bath Addition (Powder Room) | $5,000 – $15,000 | $12,000 – $25,000 | Rough plumbing, supply lines, 20A GFCI circuit, framing, drywall, vanity |
| Full Bath Addition (With Shower/Tub) | $15,000 – $30,000 | $25,000 – $50,000+ | Main soil stack tie-in, full wet-area waterproofing, venting, fixtures |
| Basement Upflush Addition | $2,500 – $5,000 | $5,000 – $10,000 | Macerating unit, electrical outlet, vertical discharge piping, AAV vent |
To avoid costly damage during your build, keep these critical installation pitfalls in mind:
- Overtightening Closet Bolts: Overtightening bolts to compensate for an unlevel floor snaps porcelain mounting flanges instantly. Always level the base using plastic shims first!
- Twisting During Placement: Twisting the toilet after it touches the wax ring ruins the airtight seal. If you misalign the bowl, lift it off completely, scrap off the wax, and start over with a fresh wax ring.
- Ignoring Flange Height: Setting a standard wax ring over a flange that sits below finished floor tile causes roughly 60% of all leak callbacks. Always install flange extenders or an extra-thick wax ring if your flange sits below tile.
- Omitting Vent Lines: Installing a drain line without a vent causes slow, weak flushing and pulls water out of nearby P-traps, allowing toxic sewer gas into the home.
For an in-depth breakdown of full room design, fixture selection, and layout optimization, visit A Comprehensive Guide To Bathroom Remodeling.
Frequently Asked Questions about Adding a Toilet
What is the estimated cost difference between adding a half bath and a full bath?
A half bath (toilet and sink) requires roughly 11 to 30 square feet of space and generally costs between $5,000 and $15,000 for DIY-finish projects, or $12,000 to $25,000 when fully installed by professional contractors.
A full bath (toilet, sink, shower, and tub) requires 50 to 80 square feet. Costs generally run from $15,000 to $30,000 for DIY-finish projects and $25,000 to $50,000+ for professional builds. The primary price difference comes from additional tiling, complex waterproofing membranes, glass enclosures, and high-capacity supply/drain lines needed for showers and bathtubs.
Can you add a toilet to a room without existing plumbing?
Yes! You can add a toilet to almost any room—including bonus rooms, upper-level closets, or basements—even if no gravity sewer line passes directly underneath.
The most efficient solution is an above-floor upflush (macerating) toilet system. Upflush units grind waste into a liquid and pump it through small-diameter PVC pipes through walls or ceiling joists to your main soil stack up to 15 feet vertically or 100+ feet horizontally. All that is required is a standard 1/2-inch cold water supply line, access to a dedicated GFCI electrical outlet, and a 3/4-inch to 1-inch discharge pipe connection.
How do you properly test for hidden leaks after installing a toilet?
To check for slow or hidden leaks that don’t immediately flood the floor:
- Perform the Dry Wipe: Thoroughly wipe dry all tank bolts, fill valve locknuts, and floor surfaces with a clean microfiber towel immediately after flushing.
- Apply the Flashlight Test: Hold a bright flashlight directly behind the tank while flushing to spot microscopic drips forming along supply line threads.
- Use the 48-Hour Paper Towel Method: Lay dry paper towels flat around the base of the toilet for two full days. Check towels periodically. Any wax ring leakage underneath will immediately stain or wet the paper towels long before water rots subfloor joists.
Conclusion
Adding a toilet or replacing an outdated fixture is one of the single most rewarding home upgrades you can perform. From accurate rough-in measurements and structural planning to setting closet bolts and compressing the wax seal, attention to detail ensures a watertight, leak-free installation that lasts decades.
While swapping a toilet in an existing bathroom is a manageable project for a confident home improver, routing new drain stacks, cutting basement concrete, or roughing in complex plumbing lines requires professional expertise.
For 25 years, our team at Smart City Renovation has helped homeowners across Chicagoland—including Arlington Heights, Mount Prospect, Niles, Rosemont, Harwood Heights, and surrounding communities—build code-compliant, beautifully designed bathrooms. Whether you need a licensed plumber to handle rough-in drain lines or full turnkey contracting services, reach out to Smart City Renovation today to plan your next home improvement project with complete confidence!